Have you ever heard a strange “pinging” or metallic rattle from your engine under load and wondered whether it’s safe to keep driving? That noise—commonly called engine knock or detonation—is one of the stealthiest threats to internal combustion engines. Left unchecked, it can erode pistons, damage bearings, and leave a once-healthy engine in need of expensive repairs.
Enter the knock sensor: a small device with a big job. It listens for the first signs of abnormal combustion and tells the engine computer to act before the engine suffers irreversible harm. In short: it’s your engine’s guardian angel. This article explains what a knock sensor does, how it works, how to spot failure symptoms, what you can try at home, and when to call a pro. Practical, technical, and usable—let’s get started.
1. The problem: what is engine knock (and why it matters)
Engine knock, sometimes called detonation or pinging, happens when the air-fuel mixture in a cylinder ignites unevenly or too early. Instead of a single, controlled combustion front pushed by the spark plug, pockets of fuel explode on their own. That produces pressure spikes and shock waves inside the cylinder that feel and sound very much like metal rattling. Over time, repeated detonation damages pistons, rings, cylinder walls, and head gaskets. In modern engines—where turbocharging and higher compression ratios are common—the risk is greater, and so the knock sensor has become even more important.
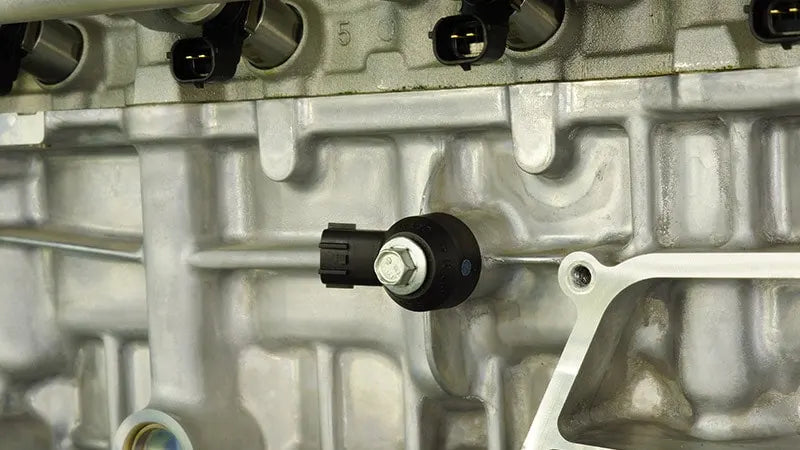
2. Meet the hero: what a knock sensor actually is
At heart, a knock sensor is a vibration sensor mounted to the engine block, cylinder head, or intake manifold—somewhere the sensor can “hear” structure-borne vibrations coming from combustion events. The most widely used design is piezoelectric: a tiny ceramic or piezo element produces a voltage in response to mechanical stress. When the engine develops the characteristic frequencies of knock, the sensor produces an electrical signal that the Engine Control Unit (ECU) monitors. If the ECU detects knocking, it pulls ignition timing back (retards timing) and may take other steps—like enriching the mixture or limiting boost—to stop the detonation. That electric signal-to-action chain is how the sensor protects the engine in real time.
3. How the knock sensor works — the engine’s “ear” step by step
Let’s unpack the chain of events simply:
-
Combustion irregularity occurs. A pocket of air/fuel ignites earlier than the spark-timed event or a secondary combustion wave forms.
-
Vibration is created. That event produces a characteristic frequency and amplitude in the block—sound converted into structure-borne vibration.
-
Knock sensor converts vibration to voltage. The piezoelectric element in the sensor converts mechanical stress into a tiny AC voltage that varies with knock intensity.
-
ECU reads and interprets the signal. The ECU samples the sensor’s output and compares it to thresholds and patterns. It uses those readings, together with other sensors (MAP, MAF, O2), to decide if the event is destructive detonation or benign noise.
-
ECU corrects the ignition and fueling. The usual immediate response is to retard ignition timing; the ECU may also adjust fuel trim or boost control. These changes reduce cylinder pressure and stop the knock. Over time, this protects mechanical components—at the cost sometimes of temporary loss of performance or fuel efficiency.
Manufacturers tune the knock detection logic carefully. The system isn’t merely “on/off”; it’s a closed-loop control that attempts to keep combustion at the edge of performance without letting it cross into damaging knock.
4. Where is the knock sensor located?
There’s no single universal location. Common mounting points include:
-
The engine block near the number 1 cylinder.
-
The intake manifold or cylinder head (depending on packaging and cylinder layout).
-
Sometimes multiple sensors are used on V-engines or high-performance applications to cover each bank.
If you’re troubleshooting, consult a vehicle-specific manual for the exact location—removing intake runners or heat shields is sometimes required to access the sensor. OEM parts suppliers like Bosch provide fitment guidance for many makes and models.
5. Symptoms of a failing knock sensor — what to listen and look for
A bad knock sensor doesn’t always mean loud metallic pinging. Its failure can show up subtly. Common signs include:
-
Check Engine Light (CEL): A stored trouble code such as P0325 (knock sensor circuit malfunction) or related codes. This is often the first clear sign.
-
Reduced engine performance: The ECU may run a safer, more conservative ignition map (retarded timing) causing sluggish acceleration and reduced power.
-
Worse fuel economy: Because the ECU pulls timing or runs richer to avoid knock, MPG can drop.
-
Intermittent or persistent knocking/pinging sound: Especially under load or acceleration. This sound is the classical “knock” and should not be ignored.
-
Hard starting or poor idle in some cases—if the ECU is aggressively compensating for an intermittent sensor.
A stored fault code combined with consistent driveability problems is a strong signal that the knock sensor circuit needs further testing.
6. P0325 and related codes — concise explanation
Mechanics frequently see codes like P0325 (Knock Sensor Circuit Malfunction) or P0327–P0332 (low/high input or sensor range faults) depending on manufacturer. These codes mean the ECU has detected a problem with the sensor’s output—either a wiring issue, open circuit, short, or the sensor itself failing to respond correctly. A code doesn’t always mean a bad sensor. Wiring faults, connector corrosion, or ECU-related issues can throw identical codes, so a careful diagnosis is essential.
7. DIY diagnosis: what you can check at home (safely)
Before replacing parts, take a stepwise diagnostic approach. Many “bad sensor” cases are actually electrical or software issues.
Quick checks you can do without specialized tools:
-
Read the code(s). Use an OBD2 scanner to read stored/active codes and freeze frame data. This gives context—when does the CEL set (cold start, under boost, uphill load)?
-
Visual inspection. Check the sensor connector for corrosion, broken pins, or a loose fitting. Follow the wiring harness for chafing or damage. Heat and engine movement can expose wiring faults.
-
Wiggle test (engine off). With ignition off, gently wiggle the harness near the sensor while watching for loose connectors. Don’t do this with the engine running unless you’re familiar with safety precautions.
-
Clear codes and road test. After basic checks, clear codes and drive under the conditions that triggered the CEL. If the code returns rapidly, the fault is persistent and merits deeper testing.
Hands-on tests (needs basic tools):
-
Multimeter continuity/resistance checks. Some simple sensors can be bench-checked for resistance, but many piezo knock sensors are high-impedance and don’t give meaningful steady resistance values. Consult vehicle-specific data.
-
Swap (where applicable). On engines with multiple sensors (V-engines), swapping sensors between banks where fit allows can help localize a bad sensor versus an ECU or wiring issue. Always clear codes between tests.
If your checks point to a wiring issue or a failed connector, fixing that is far cheaper than replacing parts that may not be faulty.
8. Professional diagnostic methods (how shops isolate the problem)
If the basic checks don’t solve it, professionals use more precise tools:
-
Oscilloscope (preferred): A scope shows the sensor’s actual waveform and amplitude while the engine runs. Technicians can tap the block near the sensor to see if the sensor detects the transient and how the signal looks under real knock conditions. If the signal is flat or noisy, the sensor or circuit is suspect. This method is definitive because it measures the sensor’s AC output in real time.
-
Back-probing and voltage checks: Using OEM-specified reference voltages and ground checks helps identify wiring faults and short circuits.
-
Scan tool live data: Some advanced scan tools show knock counts or knock retard values and the ECU’s response strategy, giving insight into how often and how severely the ECU is detecting knock.
If you plan to do deeper tests at home, an inexpensive OBD2 scanner plus a digital multimeter can solve many problems. But interpreting oscilloscope traces and ECU knock maps is specialist work—best left to a technician unless you’re comfortable with automotive electronics.
9. Is it safe to drive with a bad knock sensor?
Short answer: Not ideal, but sometimes unavoidable for short trips.
When the ECU loses reliable knock information, it will typically run a “safe” mode—retarding timing or limiting power—to protect the engine. That means lower performance and higher fuel use, but generally prevents immediate catastrophic damage. However:
-
If the sensor is intermittent or the ECU’s protection is insufficient, real detonation may occur, especially under heavy load (towing, climbing hills, heavy acceleration).
-
If the CEL is accompanied by audible heavy knocking, you should stop and have the vehicle inspected. Continued high-load driving with active knock can accelerate engine damage.
In short: short, low-load trips in limp mode might be tolerable; long, high-load driving is not.
10. Replacement: parts, labor, OEM vs. aftermarket
Cost: Replacement cost varies widely by vehicle. Typical nationwide ranges fall roughly between $200 and $800, depending on part price and labor (some sensors are easy to reach; others require removing intake manifolds or accessories). Dealer labor can push costs higher for certain models. For example, RepairPal and J.D. Power list typical ranges that reflect these differences.
Parts: OEM sensors from brands like Bosch are well-regarded; an OEM part often costs more but is engineered to match the vehicle’s calibrated thresholds. Aftermarket sensors can be fine—but quality varies. If you buy aftermarket, choose reputable brands and confirm fitment. Bosch, for instance, produces a wide range of knock sensors and publishes specifications for motorsport and OEM applications.
Labor considerations: Access matters. On transverse V-6 or turbo engines, the knock sensor may sit under intake plumbing, requiring removal of parts and extra labor. Labor usually forms the bigger portion of total cost on these vehicles.
11. How to replace a knock sensor (overview)
If you’re competent with tools and have vehicle-specific instructions, replacing the sensor can be a manageable DIY job for some cars. Typical steps:
-
Disconnect battery negative (safety first).
-
Remove components that obstruct access (intake, heat shields, etc.).
-
Unplug the sensor harness and remove the sensor—usually a single bolt.
-
Compare the old and new sensors for thread size and connector shape.
-
Fit the new sensor and torque to spec (OE torque is important; over-torque can damage the ceramic element).
-
Reinstall removed components, reconnect the battery, and clear the codes with an OBD2 scanner.
-
Road test and re-scan to ensure the code doesn’t return.
Always follow a factory repair manual for torque specs and access sequences. If the job requires removing heavy or complex components, a shop visit may be the safer and faster option.
12. Testing a knock sensor: bench and in-vehicle methods
Bench test: Some sensors can be tapped gently to see if they produce a voltage spike (measured with an oscilloscope). But bench tests can be misleading because a sensor’s behavior depends on mechanical mounting and engine block coupling. The sensor’s response when bolted to the block is the true measure.
In-vehicle oscilloscope test: This is the gold standard. With the engine running and the scope probe on the sensor lead, a technician watches for characteristic waveforms and amplitude changes while the engine is revved or lightly tapped near the sensor. If the scope shows no response, or erratic noisy output, suspect the sensor or circuit.
Multimeter checks: You can check for shorts or open circuits and verify connector voltage for some sensor types—but don’t rely on DC resistance alone to verify piezo sensors.
13. Frequently asked questions (knock sensor quick answers)
Q: What’s the difference between a knock sensor and an oxygen (O₂) sensor?
A: A knock sensor measures engine block vibration (structure-borne acoustic signals) to detect detonation. An O₂ sensor measures exhaust oxygen to inform fuel trim and emissions control. They serve different control loops in the ECU.
Q: Can a bad knock sensor cause my car to fail an emissions test?
A: Indirectly, yes. If the ECU retards timing or changes fueling to avoid detected knock, tailpipe emissions can worsen. Also, the CEL from a P0325 will typically fail the emissions readiness check in many inspection regimes.
Q: How long does a knock sensor last?
A: Many sensors last the life of the vehicle, but heat, oil contamination, and vibration fatigue can cause failures—especially on high-mileage engines. There’s no strict lifespan; treat failure as a wear item that is uncommon but not rare.
Q: Why can a new knock sensor be expensive?
A: Costs reflect specialized piezo materials, engine-grade ruggedization for heat and vibration, and sometimes integrated harnesses. Price also depends on whether the part is OEM or aftermarket. Labor to access the sensor can make the repair feel expensive too.
Q: Is the knock sensor the same on every car?
A: No. Sensor type, mounting, and ECU knock logic vary by manufacturer and engine architecture. Some high-performance or modern engines use multiple sensors or more advanced knock detection algorithms. Always use vehicle-specific parts and procedures.
14. Practical scenario: a diagnostic checklist you can follow
If you have a vehicle with P0325 or knocking symptoms, follow this prioritized checklist:
-
Read codes and freeze-frame data with an OBD2 scanner. Note when the CEL set and under what load/speed.
-
Visually inspect the sensor and wiring. Look for damaged harnesses, melted insulation, oil-soaked connectors, or loose pins.
-
Clear codes and test drive under the conditions that previously triggered the problem. Re-scan.
-
If the code returns, perform electrical checks (harness continuity, ground quality).
-
If wiring checks out, perform a scope test (or take the car to a shop that can). The oscilloscope will quickly reveal whether the sensor or the ECU circuit is at fault.
Replace the sensor only after reasonable wiring and ECU checks—this avoids unnecessary parts swaps.
15. Final words — don’t ignore the little noises
Knock is an early warning. The knock sensor gives your ECU a chance to act before mechanical damage occurs. Ignoring pinging, delayed ignition, or a persistent knock-related CEL risks turning a modest repair into an engine tear-down.
If you hear persistent pinging under load, or you’ve got a P0325 code, treat it as actionable. Start with the simple checks above. If you aren’t comfortable with wiring or oscilloscope diagnosis, take the car to a trusted shop and ask them to show you the sensor waveform—seeing is believing, and a proper oscilloscope trace is the most reliable way to confirm the sensor’s health. Delphiautopartspicoauto.com
Want help figuring this out on your vehicle?
If you tell me your car’s make, model, and the exact codes from your OBD2 scan, I can walk you through a vehicle-specific troubleshooting checklist—what wires to check, where the knock sensor is likely to be, and whether the job is a DIY candidate or a shop job.
Sources & further reading
(Quick list of authoritative references used in this article.)
-
Edmunds — “How Does a Knock Sensor Work and Why Is It Important?” Edmunds
-
Bosch Motorsport / Knock Sensor KS4-R technical notes. Bosch Motorsport
-
Delphi Technologies — “How to diagnose a faulty knock sensor” (diagnostic/oscilloscope guidance). Delphiautoparts
-
J.D. Power — Typical replacement cost ranges. J.D. Power
-
Pico Technology — Automotive guided tests for knock sensors and oscilloscope testing. picoauto.com
-
RepairPal / Repair cost examples (vehicle-specific estimates). RepairPal.com
-
Technical background on piezoelectric knock sensors and patent history.